
So…this is my first attempt at writing a blog for my crochet! It is only fitting therefore that I make my first post about my favourite blanket that I made for me…

This is the Vintage Flower Blanket. I had bought some beautiful Fibra Natrura Bamboo Jazz which I purchased from ebay…I must apologise now as I don’t know if it is still available! If you can’t locate any, then the blanket can still be made with any other yarn, so don’t let it stop you!
So anyway…this is probably best for an intermediate skill level and here is what I did…
YARN:
I must apologise again as the yarn tags do not have names on them – only colour numbers so I will give them my own names with the number. But don’t be afraid to try your own colours in your own yarn! All you need is eight colours for the squares and one for the borders/joining.
The yarn is 50% cotton, 50% bamboo and is a light weight (3). I used a 4mm hook.
- 2 x white (201)
- 1 x vintage pink (203)
- 1 x pink (214)
- 1 x light green (208)
- 1 x green ((209)
- 1 x sunny yellow (213)
- 1 x mauve (205)
- 1 x blue (207)
- 1 x torquoise (206)
Essentially I made what I could from each skein of yarn – for me it was 6 squares each – so a total of 48 squares. The white was used for the borders on each square and for joining. You might need more of each to get to 6 squares, or adjust your hook size.
As a guide – if using a different yarn – each ball is 50g (1.75oz) and 120 metres (132 yards)
PATTERN
To make this blanket I used this pattern here. The Ana-Maria Square on CypressTextiles. It’s designed for an intermediate skilled crocheter and has both the chart and written instructions and pictures – all in US terms.
If you need converting to UK terms then sc = dc; dc = tr and tr = dtr.
The only variation that I added was to add a white border around each square in half double crochet (hdc) [UK = half treble – htr] in each sc on the last coloured row, with two in each of the corners (maybe three sometimes as I would often forget!)
With the yarn I used, each square ended up being 14 x 14cm or just under 5.5inches square. As a tip – weave in the ends as you go so that you don’t need to spend ages doing it at the end…
I still love how pretty the squares are!

JOINING
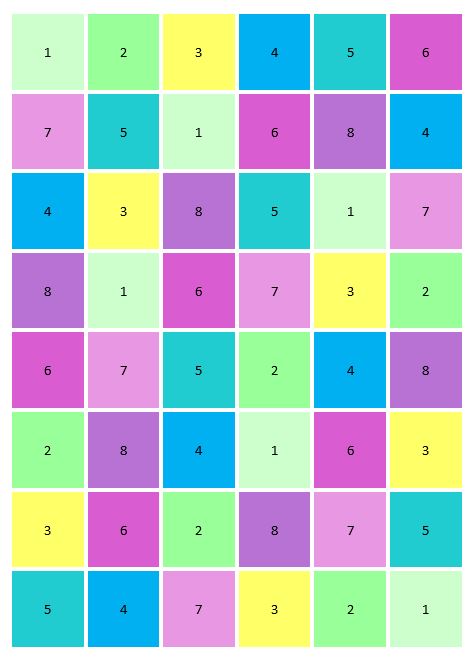
I am not one to block my squares for a blanket – feel free to if you want! To join the squares I laid them all out as per the colour/number guide below – six squares across by eight squares down – it took me ages to get it so that there were none of the same colours in each of the vertical or horizontal rows, and hardest of all – none of them touching in the diagonal either! So below is a colour guide for you (you’re welcome!).
I joined each square with a hdc, one row at a time by joining the all of one row together, then joining each square of the next row together and then joining the last row to the previous row…does that make sense?? If not, just join in whatever sequence makes sense to you! What I liked about this join is that it ended up raised and made the squares look like they were a little bit ‘sunken”.

BORDER
So once all the squares were joined I finished the blanket off with a simple crab stitch. If you’re not aware of the crab stitch it’s simply a single crochet (dc in UK) but going backwards – so insert the hook to the stitch on the right, not the stitch on the left. Feel free to google to find instructions that work for you! I liked this border as it was simple, and it didn’t distract you from the detail in the squares.
I hope these instructions make sense! Feel free to give me feedback, and show me your blankets too! And the bonus of this is that the colour grid can be used for any style blanket or colour choice – as long as you have squares, have 8 colours and make 6 of each one 🙂
NOTE: Since publishing this I have generated a pdf that you can download and refer to at any time. Download it here

Thats a really handy chart Seona, the colours are lovely and I hadn’t realised that about crab stitch. You’ve made it sound a lot easier than I thought so I’m going to have to try it out now!!
LikeLiked by 1 person
Thank you for your feedback Heather! And enjoy trying out the crab stitch! I have found it useful for the edge on coasters too as it makes it more rigid.
LikeLike