
I have always loved a bolero and always struggle to find the ones I like in a store. I even struggled to find a pattern for one online! I finally came across this pattern with guidance on ravelry. And it’s free! I used a different square to the one included though as I wanted a different finished look, but it was great as it gave a sizing guide which is what I needed more.
So I thought I would share the love too and provide instructions for how I made my version.

Yarn & Tools
I already had the yarn I wanted to use – this Wys Exquisite.
And I used a 3.0mm hook.
The Square

I just needed a pattern of a square to use. I scrolled the internet and found this square to use! It was written for a worsted weight and was designed to be quite big. So I tested it out with my finer yarn with the 3mm hook and determined it was the right size for me 🙂
The only other changes I made (by accident) were in rounds 8-11 where instead of skipping 2 stitches I skipped 1.
Each of my squares ended up being approx 14cm each side once blocked.
I made 10 as the bolero patter called for.
Construction

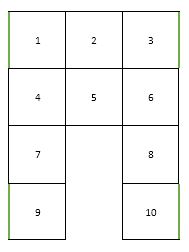
I used the diagram below as the guide for joining the squares together.


I joined the squares with right sides facing and with a single crochet (double crochet for UK) in each stitch, working across the rows in number order, first from 1 to 3 then squares 4 to 6. Then joined the rows together until I had them joined as above.
Once the squares were all joined together I then continued with the same joining method and right sides together to join square 1 to 9 and 3 to 10 along the green sides as per the diagram below. I recommend pinning them together with stitch markers or clips to make sure you are joining in the right places & don’t accidently stitch up the arm holes!
Then came the fun part! I wove in all the ends before I did the edging as I knew that I would want to wear it as soon as possible after finishing!
Once joined, the edge between squares 4 & 7 and 6 & 8 are the shoulder seams and the sides of those squares form the arm holes.
The edging – the main part
To create an edge around the main part of the body I started at the back – I recommend starting somewhere near the edge on square 1 or 3 so it is more out of sight. I have worked this as a scalloped edge, but I think would work well to also just do two rounds of single crochet (double crochet for UK) like the arms if you want a plain edgeing.
Round 1 I attached in a stitch away from one of the joins, chained 1 and worked 1 single crochet (double crochet in UK) into each stitch. This gave it a clean line. I then slip stitched to join the end of the round and chained 3 to start the next round.
Round 2 In the 1st stitch I worked 6 double crochet (treble in UK) (counts as 7 with the ch3. I then skipped a stitch and worked a single crochet (double crochet in UK) into the next stitch. Then skipped the next stitch and worked 7 double crochet into the second stitch. Then I repeated all the way around with 7dc (tr), skip1, 1sc (dc), skip1. At the end I had 2 stitches left before the first group of 7. I then slip stitched the top of the first ch3 to the second last stitch.
The edging – the arms
To edge the arms I simply joined near the underarm seam, chained 1 and worked a single crochet into each stitch for two rounds.
So what do you think?


Surprisingly simple and totally adaptable! And it has sparked lots of pattern ideas in my head too…
xx

One thought on “Bolero”