I promised on facebook that I would give you this dishcloth as a free pattern!
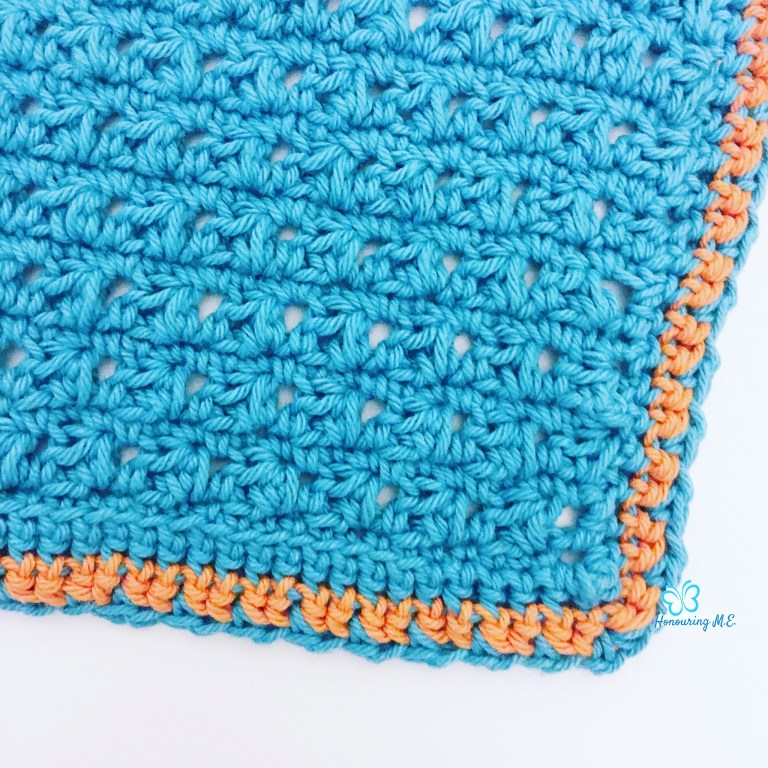
I made this one up as I went along based on a stitch I found in my 500 crochet stitches book. The stitch used for the body of the dishcloth was the Mixed Cluster Stitch on page 35 but I kind of mixed it up a bit as I didn’t follow the instructions properly – which is why you see gaps in my dishcloth but not in the stitch guide in the book. I have included instructions for how to work it my way as well as the right way though. My way looks less dense and will use less yarn and will probably make for a larger dishcloth.
If you can do a 3 double crochet (treble) together, then you can do a mixed cluster stitch. Essentially the mixed cluster is a double crochet and 2 half double crochet together – or if you prefer UK terms it’s a treble and 2 half trebles together. The two half double crochets are worked into the same stitch though, and you skip a stitch in between the double crochet and the first half double crochet so it is still worked across three stitches.
Does that make sense so far?
I’ll describe how to make the cluster stitch and then will outline the pattern of the dishcloth.
Mixed Cluster Sitch
- Yarn over
- Insert hook into the stitch and pull through
- Yarn over
- Draw through the first two loops and stop
- Yarn over
- Skip the next stitch and insert your hook into the third and pull through and stop
- Yarn over
- Insert your hook into the same stitch (the third one still) and pull through and stop
- You should now have 6 loops on your hook.
- Yarn over
- Pull through all 6 loops on your hook.
I then worked the next mixed cluster stitch into the next stitch instead of into the same stitch as the 2 half double crochet stitches worked in to. (My bad!)
Materials Used
I used Knit Picks Dishie to make mine. This is a worsted weight cotton that is designed for dishcloths! It comes in a big range of colours and is nicely priced. I used close to half of one ball of the blue. You can easily adjust this pattern though if you don’t have enough yarn or you want to make something different.
Size:
Mine ended up roughly 25cm square.
Pattern – US Terms (UK)
To begin I chained 41. If you want to change it to make it bigger or smaller then work in multiples of 2 and add one.
Row 1: Skip the first two and work one single crochet (double crochet) into each stitch to the end. Chain two and turn.
Row 2: This is the cluster stitch row. The chain two from the row before counts as a half double crochet (half treble). Make one mixed cluster into the first and third stitch and chain 1. Repeat the steps in italics until the end. Chain 1 and turn
Row 3: This is a row of single (double) crochet. Work 1 single (double) crochet into each stitch across. If you follow my pattern then you will need to work 2 single crochet into each chain space. If you make the mixed cluster correctly (by working the first steps of the next stitch into the last stitch of the mixed cluster) then you will be fine with 1 stitch in each. Once you get to the end, chain two and turn.
Then keep repeating rows 2 and 3 until you get to the size that you want. I did 12 rows of the cluster stitch in total and finished on a row of single (double) crochet.
Border:
To start the border, I used the same colour and worked 1 single (double) crochet into each stitch and row around and worked 3 into each corner.
Row 2: with the back side facing, I attached the orange, and working into the back loop only, I worked 1 single (double) crochet into each stitch around and worked 3 into the middle corner stitch of the starting row. I fastened off at the end.
Row 3: I worked in blue again and front side facing. Attach anywhere, though a corner might be easiest. I did 1 single (double) crochet and chained 1 and skipped one and repeated all the way around. In the corner stitch I did 1 single (double) crochet, chain 1, 1 single (double) crochet into the middle stitch of the corner of the round before. Slip stitch to the top of the first single crochet and fasten off!
I find that making new stitches into a dishcloth is an easy way to practice that leaves you with something you can actually use! I think this would work up pretty as a baby blanket too. You could keep is smaller and make coasters.
So I hope you have fun with this one! I enjoy stitches like this that end up pretty but are kind of simple to do. If you follow the instructions from the book then it will end up looking more dense, but I quite like that mine has gaps in it – but isn’t that how new stitches get created? By screwing up and liking it anyways??
Let me know what you think! Feel free to join my facebook group if you need extra help or just want to show off your work!
xx
