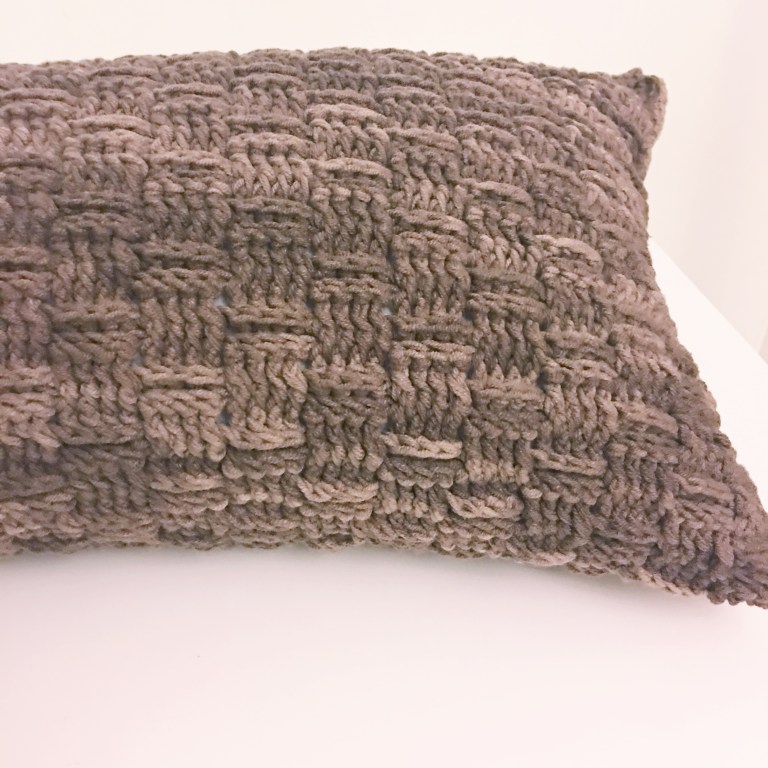
You might have seen this cushion I made on instagram. I made it for my husband as he decided a small cushion would come in handy for him at work. I have written the pattern up and it is for sale here in my store. I have also included a version of it in this blog for you so that you can make your own for free if you prefer. In the paid version the UK and US terms have been separated so that it is easier for you to follow. For the sake of this blog I have written then together here so I don’t look like I am repeating myself!
Materials
- I used Scheepjes SoftFun Denim and needed 3.5 balls for the cushion insert that I had.
- Cushion Insert – the one I used was approximately 30cm wide and 22cm tall.
- 4mm hook.
- Buttons – is used 8 approx 2cm wide
- Stitch markers, pins or clips to mark out button placement.
- Needle for the buttons
Gauge
I didn’t take this, but I will give instructions for you to make it fit your cushion cover.
Measurements
My cushion was approx. 30cm x 22cm.
Abbreviations US terms (UK terms)
| US TERMS | UK TERMS | ||
| ss | slip stitch | ss | slip stitch |
| ch | chain | ch | chain |
| sc | single crochet | dc | double crochet |
| hdc | Half double crochet | htr | Half treble |
| dc | double crochet | tr | treble |
| fpdc | Front post double crochet | fptr | Front post treble |
| bpdc | Back post double crochet | bptr | Back post double treble |
Pattern Notes:
I will not give the exact chain number in this pattern – I will instruct how to make it fit for your cushion.
Use whatever buttons you have in stock or prefer. I used 8 x 2cm because that is how many I had that looked the same and went ok with the yarn. I will instruct as to how you can make it work for you.
When working a front post double crochet (treble) the trick is to make the hook push the post to the front.
When working a back post double crochet (treble) the trick is to make the hook push the post to the back.
Each row ends with a double crochet.
The chain 2 turning chain counts as the first dc in the row.
As the cushion was smaller I decided to keep the basket weave small. If you want a bigger basket weave then complete more row repeats before moving on to the next repeat.
Special Stitches:
Front Post Double Crochet (Front Post Treble): Yarn Over. Insert the hook on the right side of the stitch post from the front, bring the hook around the back of the post to the front (the post will be in front of the hook). Yarn over and work the double crochet (treble) as normal.
Stitch Name: Yarn Over. Insert the hook on the right side of the stitch post from the back, bring the hook around the front of the post to the back (the post will be behind the hook). Yarn over and work the double crochet (treble) as normal
Pattern –
| ROW | INSTRUCTION |
| Begin | Make a base chain. Work in multiples of 8 until the chain is the same length or slightly longer than the width of the cushion with only slight tension on the chain (do not pull it to stretch!). Once it is at the length you need then add 4 more chains.
|
| Row 1. | Skip the first 3 chain (1dc/tr). Work one dc (tr) into the next stitch and each stitch to the end. ch 2 and turn. |
| Row 2. | Skip the first double crochet (treble)| 1fpdc (fptr) around each of the next 4 stitches, 1bddc (bptr) around the next 4 stitches | repeat the steps in bold until you have one stitch left. Work 1dc (tr) into the last stitch. ch2 and turn.
|
| Row 3. | Repeat Row 2. If you want a bigger basket weave, repeat this for a total of up to 3 times before moving to the next row.
|
| Row 4. | Skip the first double crochet | 1bpdc (bptr) around each of the next 4 stitches, 1fpdc (fptr) around the next 4 stitches | repeat the steps in bold until you have one stitch left. Work 1dc (tr) into the last stitch. ch2 and turn.
|
| Row 5. | Repeat Row 4. If you want a bigger basket weave, repeat this for a total of up to 3 times before moving to the next row.
|
| Row 6 onwards | Repeat Rows 2-5 until you reach the desire length. You want the piece to wrap all the way around the cushion and meet up/overlap in the middle of the back. For me it was approximately 46cm. You want it to be long enough to reach around your cushion without having to force it to stretch too much and so that the ends slightly overlap. Note – the fewer buttons you have the more you will want it to overlap. You can get away with less overlap if you use more buttons.
Once at this length move to the final rows.
|
| 2nd last row | Work 1hdc(htr) into each stitch to the end. ch1 and turn. |
| Before starting the last row you will need to work out where you want your buttons. You can do this with maths or you can just space them out and mark approximately where you need each button to go. I marked them with clips, but you can use anything that doesn’t fall off and isn’t permanent.
|
|
| Final Row | We will create button holes by using chain stitch and skipping the number of stitches that you chained. How many you chain will depend on the size of your buttons. My buttons were approximately 2cm so I chained 3 and skipped 3. The buttonhole needs to be smaller than the width of the button. The button should be able to squeeze through the button hole with minimal of force – but it should require some force.
Work 1sc into each stitch until you reach a button placement. Chain(3*) and skip(3*) then work 1sc into each stitch until the next button placement. Continue until you get to the end. Fasten off.
*replace the number with what works for your buttons and cushion.
|
| TO JOIN | Decide where you want the cushion to join with the buttons on the back. I chose to have the join in the middle of the back. For a square cushion you might want this to be in the top third of the back. You could even decide for it to be on one of the sides. The choice is yours, but it needs to be made now before we join the sides together.
Once decided secure the sides together – you can use the clips, pins or stitch markers that you used to mark the button holes. Refer to the photo below. Attach your yarn to one end (corner) of a side – ensure you are working through both sides of the fabric or you will have a holey seam edge. Ch1 and work 1sc(dc) across to join the sides together. Ensure you work through to the corner. Chain 1 and turn and work 1sc(dc) into each stitch already created. Once you get to the end fasten off and repeat on the other side.
|
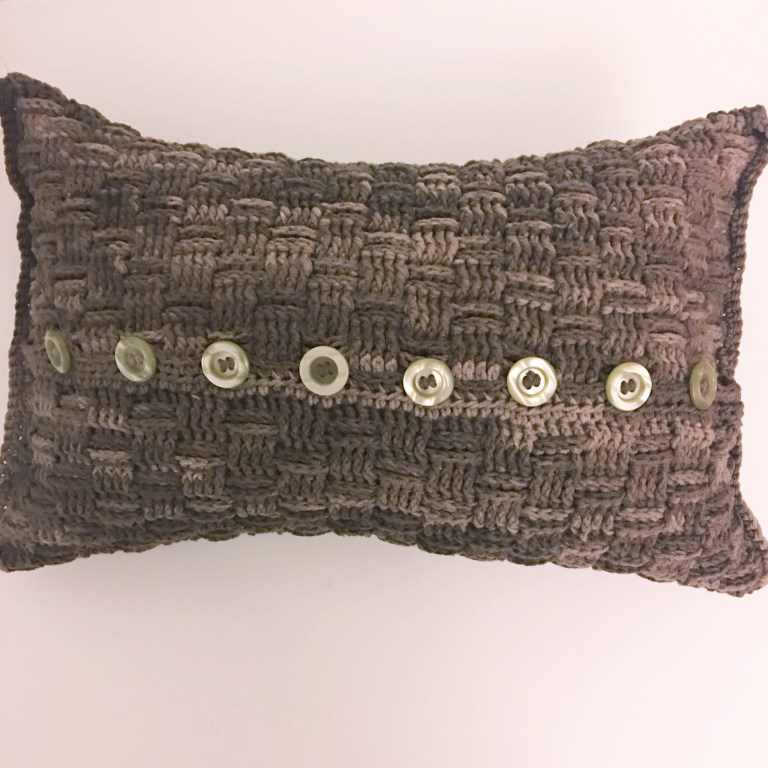
Once your cushion is joined you will need to sew on all of the buttons. Make sure they are placed on the opposite edge to the button hole and opposite where a button hole was place. Sew them on one by one ensuring that you work around the stitches of the cushion to keep them secured.
When you have your buttons sewn on, insert your cushion insert, do up the buttons and enjoy!
This should also give you an idea of how I format and write all of my patterns. i hope you like it!
I would love to see your cushions too. Feel free to tag #honouringmecrochet so that I can see them!
Seona x
